
Dedicated to the Promotion and Preservation of American Muscle Cars, Dealer built Supercars and COPO cars. |
|
|||||||
| Register | Album Gallery | Thread Gallery | FAQ | Community | Calendar | Become a Paid Member | Today's Posts | Search |


|
|
|
Thread Tools | Display Modes |
|
|
|
#1
 08-31-2007, 06:28 AM
|
||||
|
||||
|
Since the guys over at the Performance Years website thought the spokes were a little too light when compared to some low mileage reference photos, I modified the washing technique a little, once again resorting to my old military modeler days. I employed another wash technique using my wife's black acrylic stenciling paint and water and the same foam brush over the prior enamel washing. I applied about 15 coats over the course of the afternoon and then, once it dried, sprayed some clear Rustoleum spray paint over it from about 3 feet away so it was almost dry when it hit the wheel rims.
The comparson photo used for color reference purposes was from a late 71 Formula.   
|
|
#2
09-01-2007, 07:24 PM
|
||||
|
||||
|
Being the tinkerer that I am, I decided that the finish on the rubber rim was a little too flat so I used a can of the black Plasti-Dip Rubber Coating Spray and sprayed several coats on the rim. That stuff is amazing. It leaves a nice rubbery semi-shiny finish on the surface that duplicates the original foam rubber finish perfectly, and I had no problems with spraying the coats immediately after one another even though the can says wait 30 minutes between coats. I think they mean if you stop spraying, and let it sit for more than a minute, it may craze the previous layer. So, I ended up just spraying continuously to fully cover all surfaces of the rim. I then just left it to sit overnight. Here is the result from this morning.
  
|
|
#4
09-01-2007, 08:50 PM
|
||||
|
||||
|
That's so beautiful, I'd wear it as a hat.

__________________
Sam...  
|
|
#5
09-01-2007, 11:27 PM
|
||||
|
||||
|
[ QUOTE ]
That's so beautiful, I'd wear it as a hat. [/ QUOTE ] I was thinking more along the lines of a broach, or maybe get another wheel and try them on as two "pasties" for the more daring ladies out there! 
|
|
#6
09-01-2007, 11:29 PM
|
||||
|
||||
|
Better not be T3's then!!!
 Or those bad boys will be training wheels down around the ankles! Or those bad boys will be training wheels down around the ankles!
__________________
Sam...
|
|
#7
09-01-2007, 11:32 PM
|
||||
|
||||
|
Just for giggles I tried a little experiment on the Parts Place reproduction fat wheel I bought last year off of ebay. While it is dimensionally correct version of the early "fat wheel," the makers used a hard plastic-like, urethane with an incorrect heavy grain and fake mold seams on it.
I used the orbital sandle with 220 grit and sanded the edges more round where they meet the spokes and partially sanded down/smoothed the entire rim and especially the fake seam they had molded into the outer circumference of the wheel. I then sprayed it with several layers of the Plasti Dip spray. I think that is the trick for the repro wheel if you wanted to use one of these for your GTO or T/A. It really got rid of the plastic repro look and now looks like the original black foam. I might install this wheel as my primary wheel and use the original one for shows (in the event I ever finish this confounded, eternal project)  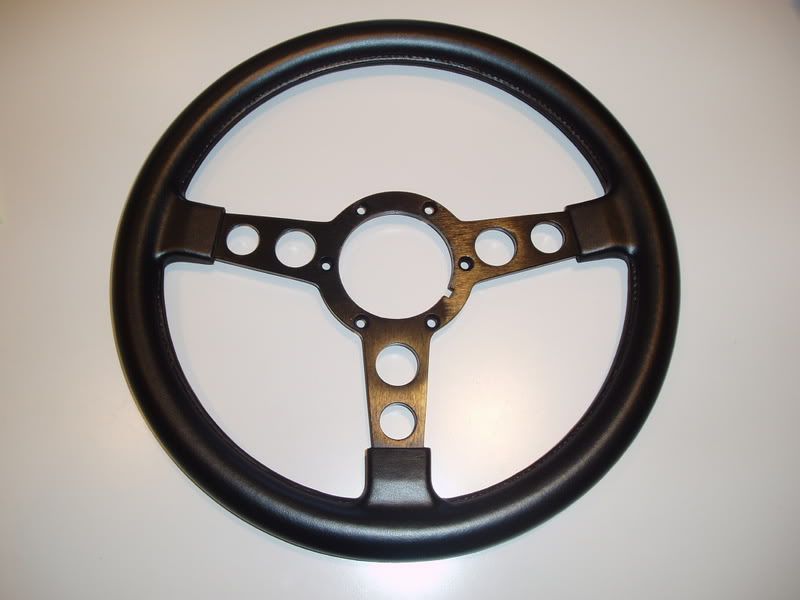
|
|
#8
09-03-2007, 04:45 PM
|
||||
|
||||
|
Steve, your skill and imagination on this restoration continues to impress and amaze me!
|
|
|
|


 Hybrid Mode
