
Dedicated to the Promotion and Preservation of American Muscle Cars, Dealer built Supercars and COPO cars. |
|
|||||||
| Register | Album Gallery | Thread Gallery | FAQ | Community | Calendar | Become a Paid Member | Today's Posts | Search |


|
|
|
Thread Tools | Display Modes |
|
|
|
#1
 02-19-2021, 06:22 PM
|
||||
|
||||
|
Install - Part III
After making the first few cuts, I later decided that the opening needed to be enclosed better, I did some more trimming and immediately remembered what people had told me. "Your gonna have to chop and hack out the side of that tunnel to get it all to fit". Yeah OK...you told me so.  Now, let me preface this next section by first telling you I'm not an experienced welder. On top of that, I broke my mask and was pretty sure there was little to no mig gas left in my bottle. Now...my metal forming skills aren't too bad so I figured it'd be best to cut the opening clean and remove the hinged panel. My plan was to then mount the shifter body and see what would be needed to enclose the body with a sheet metal box, and do so while not making it too big so that it impedes the travel of the bucket seat. I figured if I could enclose it with a decent box, I could provide enough of a top that a customized boot could be fabbed on a smaller base, and that way I'd have a smaller upright boot to wrap around the shifter. I ended up fabbing some thin sheet metal to close in 3 sides and encase the shifter body. I then got ready to stab it with blind welds since I had no mask. Yup...the tank was also running empty so in addition to a few holes being burned through on the thin 24ga metal, there were a few less than ideal welds on my part (lol). Being persistent, I got some decent spot welds to penetrate everything nicely and it was enough to hold it all together. I got it to fit the body of the shifter and then moved onto the shift rods which would need slotted.  Here is an end piece I hammered and dollied out of 24ga metal to form it up along the side of the tunnel.  I did the same for the left side and then cut a filler piece to weld between the two sides. All in all, I was happy with it. 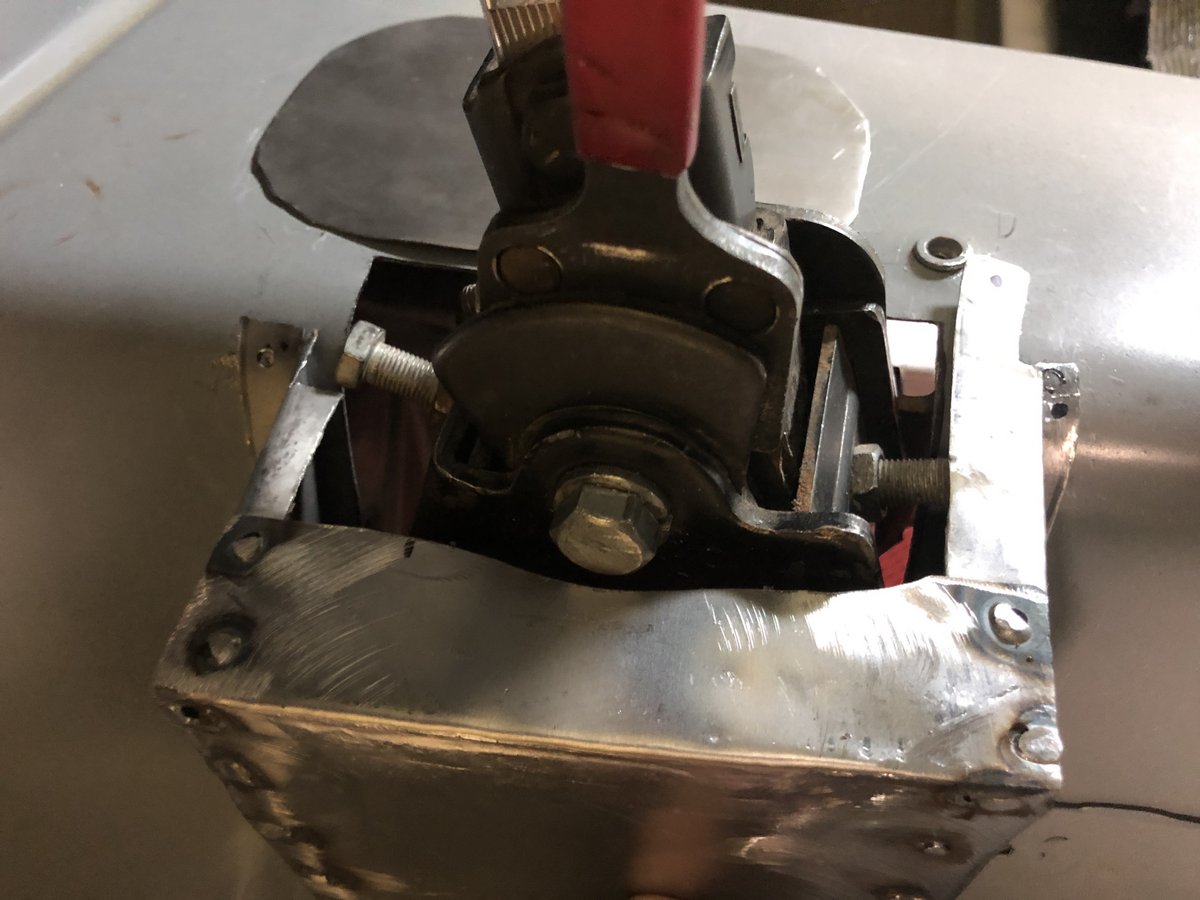 The issue with the box was the interference with the shift stop bolts on the case. It means all adjustments will have to be done on mock-up before the transmission is installed.  Here is the box after it was primed with the front cover already roughed together for the shift rod slotting.
__________________
I like solid lifter cars, big cams and cars w/ 3 pedals in them. 

|
|
#2
02-19-2021, 06:36 PM
|
||||
|
||||
|
Install - Part IV
The beefy 3/4 shift rod was the one that would present an issue with clearance in the tunnel. It mounts to the outer 3/4 shift leg below the shifter body, and as luck would have it that leg already protruded out beyond the tunnel wall (see image 1 below). I installed the shift rod and wedged it up between the tunnel and the front of the trans side cover. That allowed me to mark the tunnel where 4" of the tunnel would need to be relieved along the back end of the rod (closest to the shifter body). Instead of pounding or massaging the tunnel outward, I chose to slot the tunnel ahead of the shifter box and this allowed the back half of the shift rod to travel through the side of the tunnel closest to where it would attach to the shifter. After it was slotted, I continued with the sheet metal work and formed a 24ga tapered cover for the outside of the tunnel. This enclosed the slot I made for the shift rod and joined to the front of the shifter box I had just finished. Building this new side cover with a tapered front, it was 7/8" deep at the point where it joined the box, and tapered out to be flush at the leading edge.  Here you can see the outer shift leg for the 3/4 position rod is out beyond the side of the tunnel. This is why it needed to have the side of the tunnel slotted.  I marked out the chalk lines in the tunnel and transferred them through to the inside before making my lateral cuts.  \ \Only the first 4" of the slot would have the rod pass out through the side of the tunnel, but I decided to cover it with a longer tapered box that ran 8" forward of the box.  Cutting a longer slot than needed, a tapered box was made with it being 7/8" deep at the shifter end and feathered out to nothing at the front.  I added a coat of epoxy to the inner seams and once it was all done and welded into place, I sprayed a few coats of black paint to the tunnel side.
__________________
I like solid lifter cars, big cams and cars w/ 3 pedals in them.
Last edited by NorCam; 02-19-2021 at 06:45 PM.
|
|
#3
02-19-2021, 06:57 PM
|
||||
|
||||
|
Install - Part V
As things wrapped up with the metalwork, I added some sound deadener material to the inside of the transmission tunnel to help with road noise. I will now move on to glue and carpet the sides of the box and will then install a new black loop carpet on the inner floors while trimming around the shifter box. I also found that by cutting down the original SS3 boot, I could install the smaller B4 boot ring. This will provide a clean and correct SS3 boot finish, but on a smaller footprint. Hoping this helps the next person who wants to install a vintage shifter in a 69 Camaro. More pics when all is finished up next week.  Sound deadener added to cancel out road noise.  It also helps to reduce the amount of heat that transfers up through the floor.  Here's a cut down SS3 shifter boot bought from Summit Racing and fit with a B4 ring from another shift boot I had laying around.  Once the carpet is wrapped around the box, this will provide a nice clean upright finish for the boot.
__________________
I like solid lifter cars, big cams and cars w/ 3 pedals in them.
Last edited by NorCam; 02-19-2021 at 06:59 PM.
|
|
#5
02-19-2021, 10:26 PM
|
||||
|
||||
|
What did you cut down on the SS3 boot?
Ryan W31
__________________
 1969 Beaumont 350 Auto White Sold 1969 Beaumont 307 Auto Green Sold 1969 Chevelle SS 396-L35 Auto Blue Sold 1969 Oldsmobile Cutlass 'S' Sports Coupe W31
|
|
#6
02-20-2021, 01:33 AM
|
||||
|
||||
|
Quote:
__________________
I like solid lifter cars, big cams and cars w/ 3 pedals in them.
|
|
#7
02-19-2021, 11:08 PM
|
|||
|
|||
|
WOW!!!! Very Nice Work
__________________
1969 Camaro SS 396 X66 Lemans Blue 1969 Corvette 427/390 Lemans Blue
|
| The Following User Says Thank You to Rumbleguts396 For This Useful Post: | ||
NorCam (02-20-2021) | ||
|
|
|


 Hybrid Mode
