![]() Dedicated to the Promotion and Preservation of American Muscle Cars, Dealer built Supercars and COPO cars. |
|
#1
|
|||
|
|||
![]()
I recently bought a 69 Chevelle SS396 with M20 4 speed and it has clutch chatter when slowly engaging the clutch, either when just starting out from a stop or when downshifting. I bought the car knowing that it had a problem in this regard, so it was not a surprise to me....I just want to get the problem fixed.
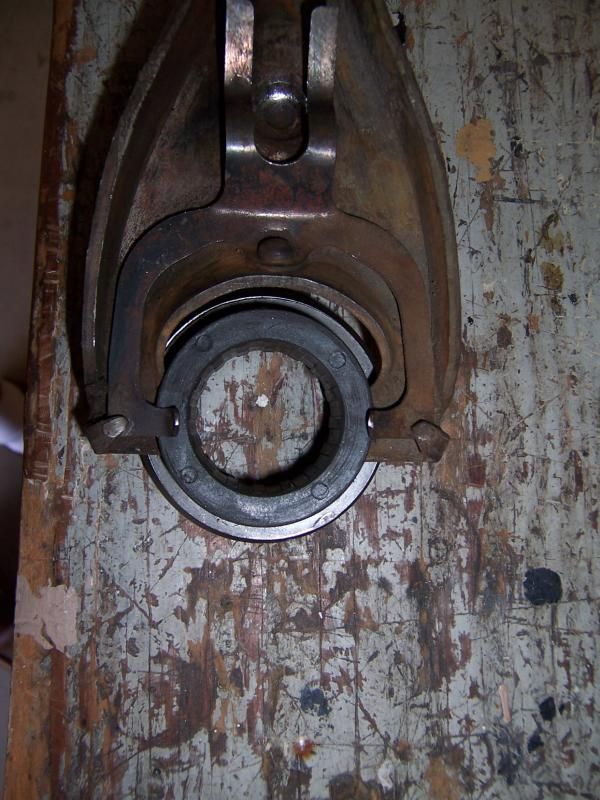
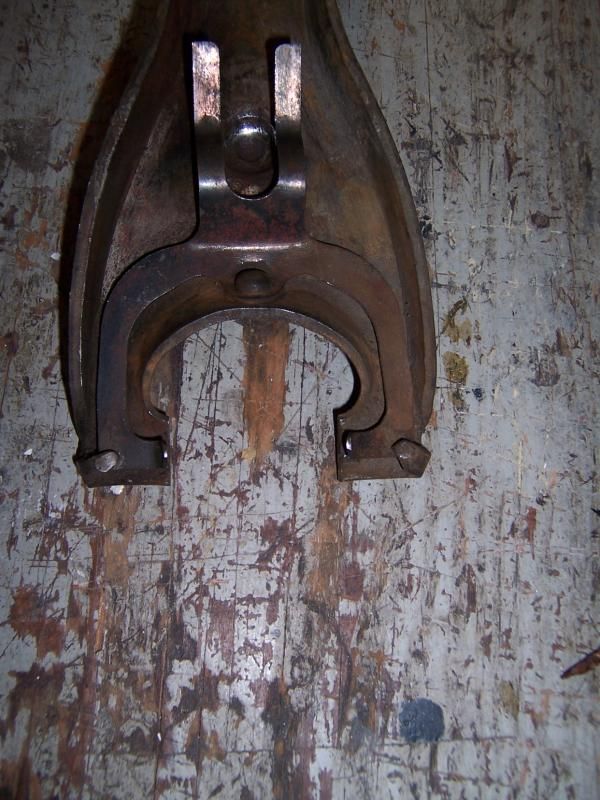
The car has all new (remanufactured) clutch disc and pressure plate, new throwout bearing and pilot bushing, and the flywheel was resurfaced. The M20 was completely gone through by Crash. It was initially assembled with all these new components and this shuddering problem came to light. Everything was removed, inspected, cleaned with lacquer thinner to ensure absolute cleanliness, and reassembled. The problem still was there. I have removed everything again and am looking for the root cause. Have a look at these pics of my clutch fork with throwout bearing installed on it. The spring steel 'tangs' that hold tension on it are not well centered on the face of the throwout bearing collar. On the one side, the tang is barely making contact with the edge of the bearing collar. Does anyone think this could be the cause of the shuddering? I examined all other components and could find nothing else that looked suspect. With the bearing removed from the clutch fork, the tangs do not appear terribly offset in the opening on the fork. Before I tore this all apart, I tried jacking up each side of the engine to see if the motor mounts might be broken, as I know that could also cause shuddering....they appeared to me to be solidly attached. Since I have everything apart, I do plan to install another clutch kit using new, non-remanufactured components. I will be interested to see if another throwout bearing has the same offset appearance as this one does. If so, I will probably try another clutch fork. Any help would be greatly appreciated!! ![]() ![]() ![]()
__________________
Bill Pritchard 73 Camaro RS Z28, L82, M20, C60 |
#2
|
|||
|
|||
![]()
Bill,
I sent you an email.....easy fix. Dan
__________________
69 300 Deluxe Post Sedan Frost Green 69 SS396 300 Deluxe Post Sedan Lemans Blue SOLD 70 Buick Skylark Post Sedan Gulfstream Blue 70 Buick Skylark Post Sedan Burnished Saddle http://m.youtube.com/watch?v=PM3DE8qI2NY https://m.youtube.com/watch?v=Yn4xEmGypUw |
#3
|
||||
|
||||
![]()
Very easy to fix and common mistake.
__________________
Rick Nelson Musclecar Restoration and Design, Inc (retired) www.musclecarrestorationanddesign.com https://www.youtube.com/watch?v=62r-6vgk2_8 specialized in (only real) LS6 Chevelle restorations |
#4
|
|||
|
|||
![]()
This is a common problem with '69 Camaros when <span style="font-style: italic">incorrect</span> motor mounts are used; maybe Chevelles are the same. I know you checked the mounts but they could still be wrong for the application.
For '69 they switched to the interlocking motor mount design for 302/350/BB engines. The new mount was narrower and thicker than the 67-68 so the frame bracket was re-designed. The listing in some Mc Parts books is either incorrect or confusing and they give you 67-68 motor mounts even if you request '69s. They will fit on the '69 frame bracket but it is a sloppy fit allowing the engine to move fore/aft. The 67-68 mount is thinner so the engine isn't positioned correctly. It's not easy to tell but the correct 69 mount is a tight fit on the bracket; the 67-68 mount will have a noticeable gap on one or both sides. I believe the 67-68 mount is 2-1/2" wide the 69 is 2-1/4". Height difference was about 3/8".
__________________
Learning more and more about less and less... |
#5
|
|||
|
|||
![]()
I am getting closer to installing my engine and transmission. What is wrong here? I am sure I will do it!! I am taking out my original motor mounts and putting in a new set.
__________________
Bill |
#6
|
|||
|
|||
![]()
Bill -- The two clips on each side should be in the groove of the throwout bearing ... not behind it. Also, make sure the disc, PP and flywheel are absolutely free of any contamination -- especially oil and dirt off your hands.
__________________
You've never lived until you've almost died -- for those who fight for it, life has a flavor the protected will never know! |
#7
|
|||
|
|||
![]()
<div class="ubbcode-block"><div class="ubbcode-header">Originally Posted By: earntaz</div><div class="ubbcode-body">Bill -- The two clips on each side should be in the groove of the throwout bearing ... not behind it. Also, make sure the disc, PP and flywheel are absolutely free of any contamination -- especially oil and dirt off your hands. </div></div>
Exactly. The bearing is installed incorrectly on the fork. Verne [img]<<GRAEMLIN_URL>>/biggthumpup.gif[/img] |
#8
|
|||
|
|||
![]()
^^^^ correct
The TO bearing pivots on the tangs of the clip, keeping the TO bearing square to the pressure plate as the fork moves.
__________________
68 z28, 68 RS 327, daily driver, 71 rs camaro, 68 firebird 400, 70 formula 400 |
#9
|
|||
|
|||
![]()
OK I had good instructions and remember that. Thanks guys
__________________
Bill |
#10
|
|||
|
|||
![]()
Also -- there was reference made to cleaning all the surfaces, meaning disc, PP and flywheel. I've seen people use aerosol carbuator cleaner -- NOT!! ... most carb cleaner contains a small amount of lubricant for throttle shafts, etc. If anything -- use brake clean as it normally doesn't leave a residue.
__________________
You've never lived until you've almost died -- for those who fight for it, life has a flavor the protected will never know! |
![]() |
Thread Tools | |
Display Modes | |
|
|