
Dedicated to the Promotion and Preservation of American Muscle Cars, Dealer built Supercars and COPO cars. |
|
|||||||
| Register | Album Gallery | Thread Gallery | FAQ | Members List | Calendar | Become a Paid Member | Search | Today's Posts | Mark Forums Read |


|
|
|
Thread Tools | Display Modes |
|
|
|
#1
 06-10-2012, 11:28 AM
|
||||
|
||||
|
Nice. Gotta love how smooth the BC system is. The Peoples Republic of New Jersey doesn't trust its own people at the local offices to do the paperwork on asylum-seeking automobiles. Hopefully they have everything now. Otherwise I'll have to return the car back to you. [img]<<GRAEMLIN_URL>>/grin.gif[/img]
So what did you buy??? 
|
|
#2
06-07-2012, 10:51 AM
|
|||
|
|||
|
[img]<<GRAEMLIN_URL>>/smile.gif[/img] gotta love DMV! NOW the weather is saying some chance of T-storms on sat. Which means I am going to make my decision on sat right before I leave [img]<<GRAEMLIN_URL>>/frown.gif[/img]
__________________
69 SS 350 convertible (in peices) 69 327 convertible (driver)
|
|
#3
06-07-2012, 07:04 PM
|
||||
|
||||
|
Found some more stuff I need:
1) The little bracket/tab/guide plate that holds the hood release pull bar in position. Here is the shot of what is on my Gramma's 75 Firebird:  And the spot where one should be on my 72 (I removed the bracket he had installed for the inside hood release as it doesnt line up with the original location for the metal pull bar).  2) I also need a clutch fan blade for the 72 since the prior owner had installed an electric fan and a solid mounted fan blade on the engine. 
|
|
#4
06-07-2012, 07:05 PM
|
||||
|
||||
|
And here is something for the archives: an original rear package tray. Looks like I was the first person to ever remove this thing from the car. Very interesting cutout for the single rear speaker with the center bar between the cutouts. The other funny thing is that the factory punched speaker mounting holes were all 1/2" too narrow. The factory speaker grill studs had to slot out the carboard holes 1/2" farther than the outer holes in order to line up with the factory stamped holes in the rear deck.
    
|
|
#5
06-08-2012, 12:55 PM
|
|||
|
|||
|
----So the question is; Do you do the new package tray the same way???......Bill S
|
|
#6
06-08-2012, 01:01 PM
|
||||
|
||||
|
Yup. I placed them on top of each other and traced the outline of the opening and the mounting holes with a pencil. I also placed the new package tray on the rear deck and traced the outline of the stamped holes in the rear deck. They all lined up nicely.
Interestingly enough, the four factory stamped stud holes in the rear deck are a circular stamp with a slot that lines up with the slots in the cardboard package tray. Looks like a little lack of communication from the engineers and the manufacturers back in the day. [img]<<GRAEMLIN_URL>>/grin.gif[/img]
|
|
#7
06-10-2012, 07:26 PM
|
|||
|
|||
|
New project name.......Bambi....???
ktownkid [img]<<GRAEMLIN_URL>>/beers.gif[/img]
__________________
Baseball, Hot Dogs, Apple Pie and Chevrolet
|
|
#8
06-10-2012, 08:52 PM
|
||||
|
||||
|
More like The Raven, for all the black crows that keep pooping on the car while I'm working on it outside. [img]<<GRAEMLIN_URL>>/biggthumpup.gif[/img]
|
|
#9
06-10-2012, 09:07 PM
|
||||
|
||||
|
Well, the interior is finally finished and back in place. I also pulled the door panels and greased and readjusted the power windows, so they go up and down nicely now. One of the power door lock solenoids doesnt work so I pulled that one and need to hunt down a replacement.
I also pulled the front dash speaker since it wasnt working. The radio had never been out of this car before, amazingly all the wires were intact including the single green wire that runs from the radio to the front speaker. Here is a shot of the passenger door which still had the factory watershield in place, and the Norwood Assembly Plant parts sticker.  
|
|
#10
06-10-2012, 09:14 PM
|
||||
|
||||
|
And here is the finished interior. Other than the carpet and the package tray, everything that came out, went back in (though a lot cleaner and tighter, especially the seat covers). Even the 40 year old original floor mats are back in place. I will probably redye to steering wheel next week. That SEM Landau black interior spray dye is awesome. I misted most of the interior plastic parts and the stuff rejuvenates black interior pieces like magic. Just a light dusting evens it all out. And it dries in seconds.
I also pulled the gauges and tried rebuilding the clock but it wasn't the points, the clock's electrical windings are bad. So I'll add a clock to the shopping list.  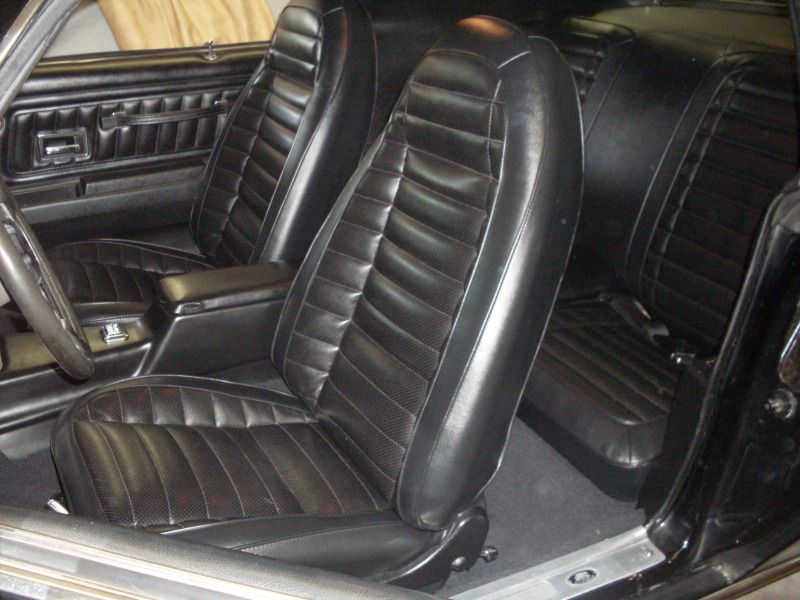 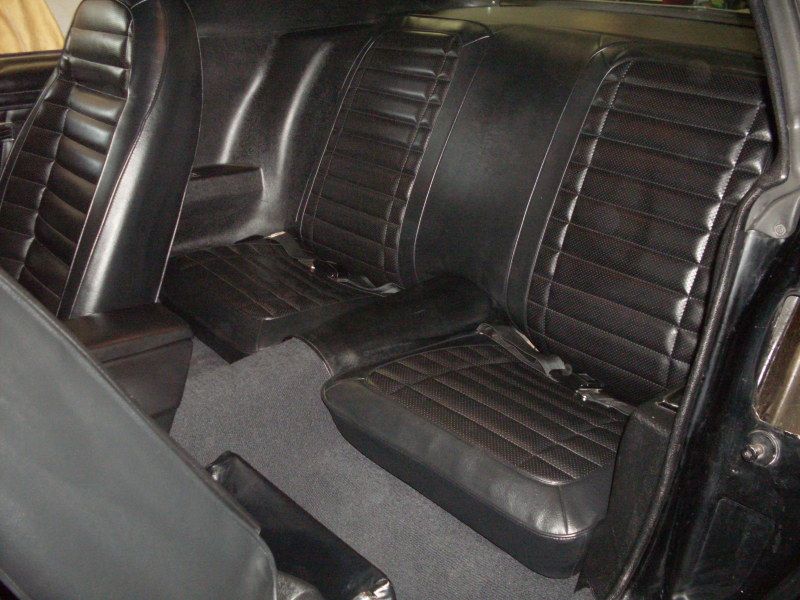  Those white circles are dust specs on my hand-me-down garage camera. Sorry about that. 
|
|
| Thread Tools | |
| Display Modes | |
|
|


 Hybrid Mode
