
Dedicated to the Promotion and Preservation of American Muscle Cars, Dealer built Supercars and COPO cars. |
|
|
|
#1
 07-07-2009, 04:13 AM
|
||||
|
||||
|
Running out of things to do at the moment so I decided to tackle the annoying unused and incorrect mounting hole in the top of the radiator shroud that comes standard when you buy the new/repro GM shroud.
Here's the before shot:  What I ended up doing was getting a 1/2" hole saw and boring out a 1/2" plug from the burned/melted original shroud that I've had hanging in the garage:  I then carefully filed the edges of the plug with a flat file and used a small rat tail file to file the hole in the new shroud. When I was satisfied with the fit of the plug, I placed a piece of tape on the underside of the hole and filled it with 5 minute sandable epoxy. I then pushed the plug into place. After it sat overnight I used my mini-mouse sander with some 240 grit and made the excess epoxy disapear. A few mist coats of SEM Laundau Black (my new favorite paint) and the repair is invisible. 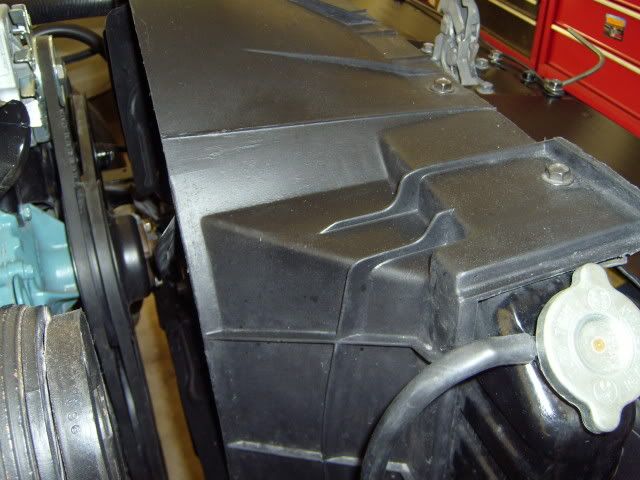 
|
|
#2
07-07-2009, 07:24 AM
|
||||
|
||||
|
Looks great Steve. I am going to take your lead and use SEM Landau black to restore my original fan shroud for my Nova. Did you use SEM's plastic prep or other prep to ready the plastic for the SEM paint?
__________________
Sam...  
|
|
#3
07-07-2009, 08:05 AM
|
|||
|
|||
|
I don't like the plastic prep. I have never had a problem cleaning the surface with lacquer thinner and applying the SEM product directly.
Jason
|
|
#4
07-07-2009, 11:54 AM
|
||||
|
||||
|
Hi Steve, looks great! Keep it up.
Could you supply a part number for the SEM?
__________________
Follow me on Instagram: https://www.instagram.com/mbcgarage/
|
|
#5
07-07-2009, 06:35 PM
|
||||
|
||||
|
15013 . I bought some recently and it is not cheap. approx. $11.00 per can. But, if it works like Steve says - no problem.
 BTW: Mike Angelo (M22Mike) recommends this stuff too! 
__________________
Sam...
|
|
#6
07-08-2009, 01:14 AM
|
||||
|
||||
|
The stuff is awesome. As an interior paint/dye, it matches the exact black that interior plastics and vinyls were produced in. I used it on the rubber T/A steering wheel, on the vinyl dash pad, on the plastic side panels. All you have to do is vary the distance from the object you are painting and it comes out flatter or glossier. (The closer you spray, the glossier it gets). On the fan shroud I just lightly misted from about a foot away and it blended right into the existing molded black plastic finish. I even used it on the metal part of the dash under the windshield to duplicate the flat/velvety dash paint.
I use it on everything - kinda like what the dad in My Big Fat Greek Wedding, did with Windex. He used it for every purpose, on everything! or like the old SNL commercial for Shimmer - it's a floor wax! No, it's a desert topping....
|
|
#7
07-09-2009, 04:04 AM
|
||||
|
||||
|
Fiddling around with some vintage parts I located years ago. These are a set of NOS Pontiac Trans Am mudflaps.
 Lest you think I drilled holes in a brand new paint job, here is the method recommended by a friend in town who has a white, original paint 68 Shelby. He has similar white Ford mudflaps and has them held on when driving with these heavy duty Home Depot mini clamps. He's been running with this set up for a while now and hasn't lost a mudflap yet. I may paint the clamps black so they don't shine so much, but other than that they seem to hold the mudflaps in place quite firmly. 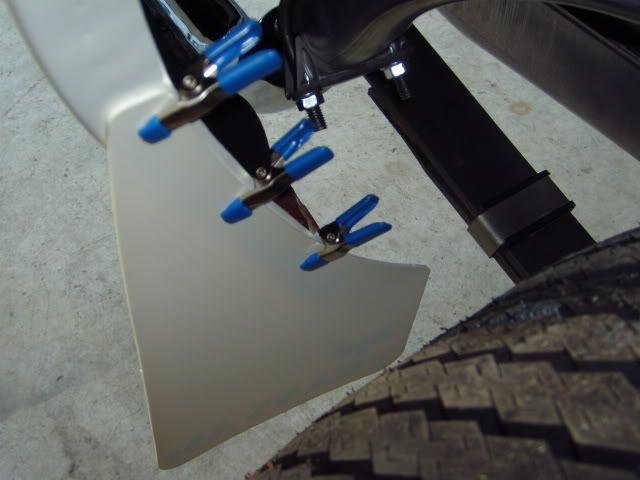 
|
 |
| Thread Tools | |
| Display Modes | |
|
|


 Hybrid Mode
