
Dedicated to the Promotion and Preservation of American Muscle Cars, Dealer built Supercars and COPO cars. |
|
#452
 08-30-2007, 04:57 AM
|
||||
|
||||
|
The latest chapter was trying to restore the original artificial leather-like-substitute, foam padded, Formula "Fat" steering wheel.
I decided to do it myself since the repro wheels are close to correct, but the makers chose to use a very hard urethane instead of a soft one (don't get me started on why companies get that close with a repro part and then don't go all the way when it would be so easy to substitute a softer durometer padding...) and the fact that the so called "restoration" services for these wheels involve them dipping it in a hard plastic outer coating like a Carvel chocolate dipped, ice cream cone (Here comes Willy the Wheel...in my best Frank Carvel/Abe Simpson voice) that cracks the first time your turn the wheel hard left or right. I decided to try my hand at redoing the original wheel because you can't nice originals for less than $750 on ebay and an NOS 1970 to 73 Fat Wheel will run you about $2000, and I had nothing to lose as my wheel was so badly damaged it was only useable as a core. (Don't confuse the "Fat" wheel with the later model thinner ones that came on 75 to 81 Trans Ams -humungous price difference) These wheels originaly had a smooth outer coating that eventually wore away after years of use and exposure to the sun, leaving the underlying rough, cracked, crumbly foam material exposed. Here is a close up of what they end up turning into:  
|
|
#453
08-30-2007, 05:09 AM
|
||||
|
||||
|
One of the main problems with my wheel (and most older wheels) was that the foam had seperated from the internal steel core at the 10:00 position and could be rotated on the core like a motorcycle throttle. If left unaddressed, this defect would prove fatal to any attempt at a cosmetic restoration as the foam would turn and crack the outer surface.
What I ended up doing was performing surgury on the wheel. I used a razor and sliced through the foam on theback side, down to the metal core, and then filled the area with black weatherstrip adhesive. Once filled, I wrapped the repaired area tightly in masking tape and left it overnight to cure. The repair worked perfectly: no more turning foam. (The in-progress photo didn't come out so here is a later photo with the incision marked in red) 
|
|
#454
08-30-2007, 05:15 AM
|
||||
|
||||
|
The biggest problem with these wheels is the lack of a similar material for repair. Some people use bondo (too rigid) or silicone (too soft), but until now there was no real alternative.
Scratching me head, I was digging around in the lab and found two 10 year old tubes of 3M rubber bumper repair epoxy. This is the stuff used for filling and repairing the elastomeric/endura bumpers on Camaros, GTOs, Trans Ams, Cudas and the like. Mixed in equal parts, it cures fast, is extremely flexible, sands easy and can be painted. Since I had nothing to lose, I used it: I ended up stumbling onto the perfect repair material. 
|
|
#455
08-30-2007, 05:21 AM
|
||||
|
||||
|
I mixed small amounts as it cures quicky and you dont want to waste the stuff. I applied it to the entire wheel with a tongue depressor. During the process, my wife (Mrs. McGyver) accidentally wandered down into the work shop and saw the mess and just shook her head telling me that I ruined that poor wheel...Yee of little faith.
Once it cured I sanded it to a rough round shape, looked for low spots, and reapplied it about five or six times. Here are a couple of in-progress shots:  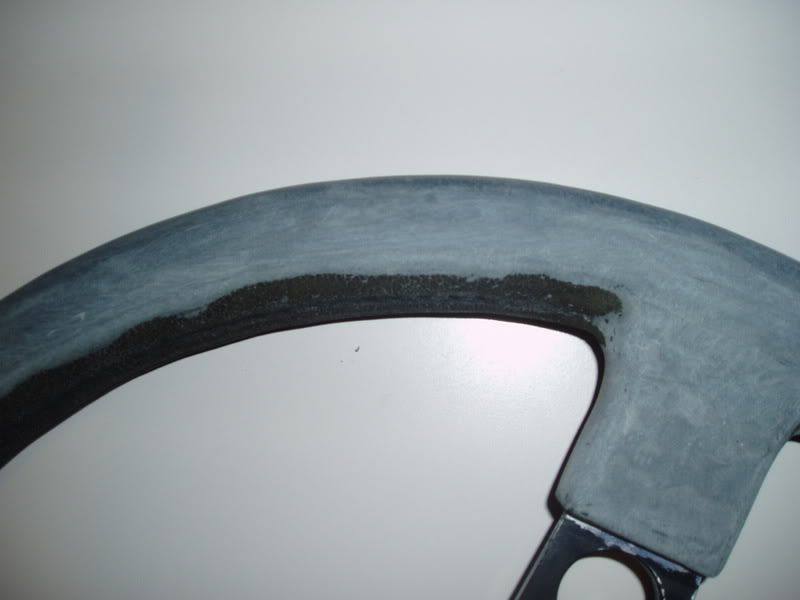
|
|
#456
08-30-2007, 05:24 AM
|
||||
|
||||
|
This is after about three days of reapplication, and resanding with 120 grit. I then sprayed it with several coats of flexible urethane primer and sanded some more with a mini-orbital sander and primed it some more. I also sanded the incorrect black paint off the spokes. This area should be anodized a gunmetal color, not painted (more on that later).
 
|
|
#457
08-30-2007, 05:27 AM
|
||||
|
||||
|
After I was satisfied with the smoothness and lack of flaws I used Duplicolor flat black vinyl paint and sprayed a bunch of coats on the wheel, hand wetsanding with 400 grit after each one to get the wheel perfectly round.
 
|
|
#458
08-30-2007, 05:38 AM
|
||||
|
||||
|
The big trick was trying to duplicate the original gunmetal anodized finish on the spokes. Since there is no way to reanodize the metal on the wheel I harkened back to my military modeling days as a kid when I used to build WWII armor dioramas for a local hobby shop and would "weather" the tanks and gear to make them look realistically "battle weary."
I used one of the old tricks of the trade, which is to do a light paint wash of the area. I sprayed a two second burst of flat black into a cup and then added a little enamel reducer. (Be very careful: as this stuff dripped on the foam wheel will ruin the finish). I used a foam brush and lightly washed the blackened reducer over the metal areas. As it dried I would daub it with a crumpled paper towel to get rid of any brush marks. I did this about 20 times. You have to be patient as each application removes about half of the previous application as the enamel reducer dissolves the earlier paint. This process worked very well as it brought out the original brushed finish in the metal. 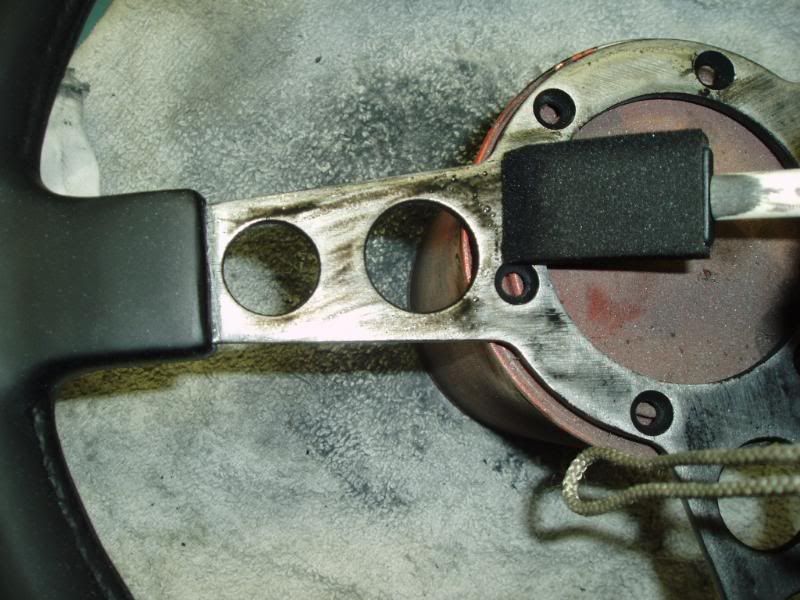 
|
|
#460
08-30-2007, 05:47 AM
|
||||
|
||||
|
Here is the finished product. The wheel looks just like the original piece and is just as flexible and soft as when it came from the factory 35 years ago.
So here it is, after about a week of work and approximately $40 in materials, sitting on top of my wife's prized antique, ceramic sugar bowl:  With a little leather preservative applied (after this photo was taken), it brought the sheen up to what the original was supposed to look like. I'd rather have it too flat than too glossy, as the wheel surface will shine up with age and use. (That's another old modeler's trick: if you want to duplicate black leather upholstery on a model car, paint it flat black and then once dried, buff the area with your fingers to bring up the shine  ) )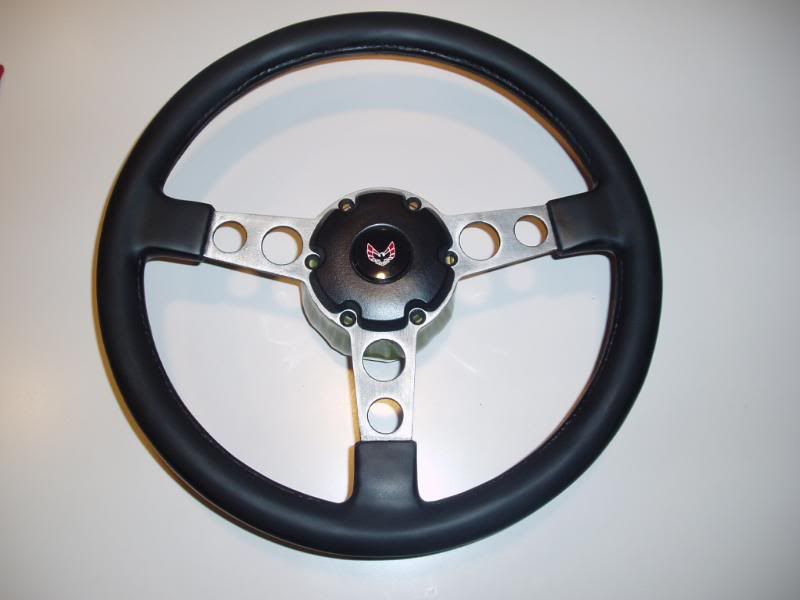 
|
 |
| Thread Tools | |
| Display Modes | |
|
|


 Linear Mode

