
Dedicated to the Promotion and Preservation of American Muscle Cars, Dealer built Supercars and COPO cars. |
|
#331
 04-21-2007, 07:51 PM
|
||||
|
||||
|
Nice job "Mac"
 ! ! BTW, Richard Dean Anderson makes the mullet look good! 
__________________
Sam...  

|
|
#332
04-22-2007, 07:21 AM
|
||||
|
||||
|
Thanks for the support.
You should see my wedding photos from Florida: I proudly displayed my full early 1990's over-the-shoulder, southern mullet with the optional Sun-In Tinted, Farrah Faucet side hair flairs, left and right of course. -NJMacGyver: The right mechanic when restorations go wrong...
|
|
#333
04-22-2007, 09:20 PM
|
|||
|
|||
|
Great thread; wish I could pull up the pics, but think my security settings are too high. Can't wait to get home from this place so I can get started on my GTX...or maybe the red Judge...or the SS...
Scott
__________________
Please check out my YouTube channel for vintage car and truck rescues and rebuilds! https://www.youtube.com/c/THEBULLETPROOFGARAGE/videos
|
|
#334
04-22-2007, 10:00 PM
|
||||
|
||||
|
Scott, your work is lot more important to us all than most people will ever realize. Keep it up.
I know what you mean about work computers. Sometimes they block the stupidest things. I have a companion post on the Performance Years website that has been following along. You should be able to open those photos individually. http://forums.performanceyears.com/f...d.php?t=433662 Tell me if it works.
|
|
#335
04-22-2007, 11:56 PM
|
|||
|
|||
|
I was able to pull up the pics on PY. Have been a member there for a year or two, but usually hang out in the Judge forum. Anyway, I made it through a few pages, but it's bedtime in Iraq. Will check out more tomorrow.
Thanks, Scott
__________________
Please check out my YouTube channel for vintage car and truck rescues and rebuilds! https://www.youtube.com/c/THEBULLETPROOFGARAGE/videos
|
|
#336
04-23-2007, 05:10 AM
|
||||
|
||||
|
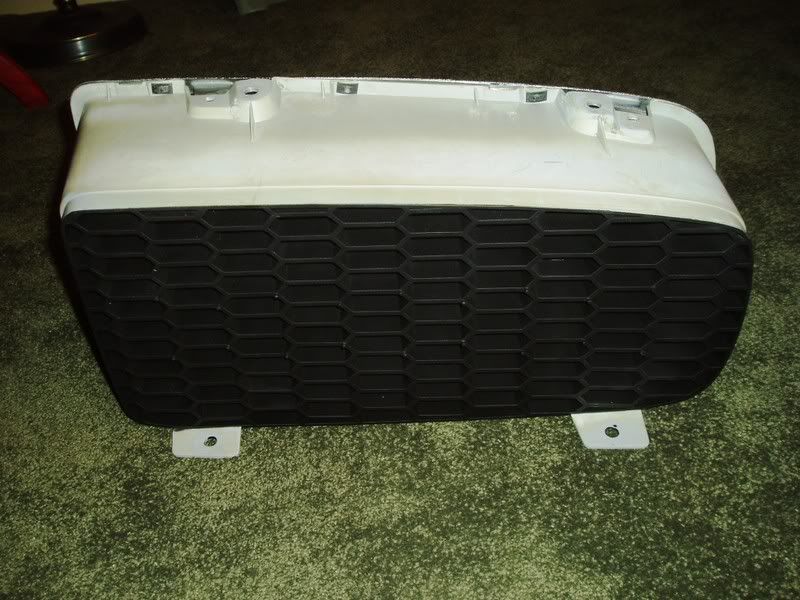
Here is the finished product. I ended up masking off the outside and painting the front and back of the blacked out grill section first. It took a lot of masking tape and newspaper. I sprayed it with flat black, let it dry and then masked off the black area and sprayed the inner part of the grill face with the OEM Paints Pontiac Honeycomb Wheel paint. As long as you follow directions, it sprays out nice and dry and leaves a nice consistant sparkly, argent finish. Once that dried I reattached the outer molding and retaining clips and I was (half) done. The other grill is still soaking at the moment and I will be finishing that one in the next couple days.
|
|
#337
04-23-2007, 05:32 AM
|
|||
|
|||
|
Very nice!
|
|
#339
04-23-2007, 06:45 AM
|
|||
|
|||
|
I love watching your progress; I love the second generation F-bodies. Your dedication and the results that you have gotten at home have been an ispiration to me and my '69 Corvette project.
I don't have the tools, skills or the room to tackle a job such as your T/A but it has inspired me to tackle the interior of my Corvette as well as a heater core replacement in the 'Vette. I thought I was done with the heater core this afternoon when I noticed that I screwed up installing one of the foam gaskets. Under normal circumstances I would have said the hell with it and just left it as is but, I think I am going to order another seal kit and re-do it so it's done right. I found myself asking myself "What would Steve or any of the other Yenko members do?" We all know that answer which is why I am ordering a new seal kit. You guys all do great work and, although I doubt I will ever turn out the results that you do, I have been inspired to get my hands dirty and not accept half assed results. 
|
|
#340
04-23-2007, 07:31 AM
|
||||
|
||||
|
That's scary when someone wonders "What would NJSteve do?"
 Maybe I should get my own sign now? Maybe I should get my own sign now?I would probably figure out some way to dissolve the foam gasket into something 1/100th its size and then inject it into the area using a single tube Dunkin Donuts coffee stirrer (never use Starbucks, you risk a bad chemical reaction). Once installed I would then inject it with the replenisher agent to enlarge it back to its original size. Barring that ...I would take it apart again and put that stupid foam o-ring back on (BTW I have done that a couple time myself on A/C-equipped cars). Good Luck with your project. I am happy to have the chance to entertain and enlighten. BTW Part II: You don't really need that foam o-ring thingy that much. You could buy some 3M strip caulk and just feed a bunch of it into the gap around the heater core tube until you have sufficient amount on both sides to fill the space. The purpose of the foam is to keep out engine smells and moisture, and to keep the tube from rubbing against the metal of the firewall. You may want to try this instead of yanking the heater box out again and risking damaging the new heater core (been there, done that, too).
|
 |
| Thread Tools | |
| Display Modes | |
|
|


 Linear Mode

