
Dedicated to the Promotion and Preservation of American Muscle Cars, Dealer built Supercars and COPO cars. |
|
|||||||
| Register | Album Gallery | Thread Gallery | FAQ | Members List | Calendar | Become a Paid Member | Search | Today's Posts | Mark Forums Read |


|
|
|
Thread Tools | Display Modes |
|
#41
 03-06-2023, 09:40 PM
|
|||
|
|||
|
I've had some "distractions", but back to the engine build...
This is the almost complete short block assembly. I like to use ATI dampers (balancers), simply because they flat out work. Yes, there are cheaper options...The timing pointer is a billet job while the timing chain cover is from Milodon. Just about every fastener is from ARP. The truth is, the only OEM Chevy parts in this entire engine are the distributor body and the thermostat housing.  This is a side view. Originally, I assembled the engine with a discontinued Holley off-shore Marine fuel pump (driven by way of a composite fuel pushrod). Since then, I've replaced the engine fuel system with a Weldon pump and regulator (-10AN to the front and then -8 AN at the carb and return). The water pump is from Edelbrock.  Here's another look at the damper/timing pointer and a bit of the pump. Pulleys are basic 396-375 jobs.  Inside, I had the block machined to accept a large Hemi diameter roller lifter (0.903-inch) from Jesel. They're considerably larger than a stock Chevy lifter @ 0.842. The increase in size allows for a larger roller wheel which in turn helps with reliability (and Jesel recommends it if possible). The cam was ground with the Hemi size lifter taken into consideration. The Jesel roller lifters are probably the most robust (and finest) tie-bar examples you can buy.  Years ago, I used to paint everything inside the block with electric motor case paint. Then a couple of folks, including the late John Lingenfelter asked me "why". I really couldn't come up with a valid reason other than "sealing the block surface". So....I quit painting them..L-O-L. Here's another look at the Jesel rollers:  Upstairs, I'm using Jesel steel roller rockers. Like everything else Jesel builds, these pieces are fabulous. You can probably guess, I went out of my way to use reliable pieces. As you can see, I'm using a 1.625-inch diameter spring (its from PAC) with titanium retainers.  Here's a comparison of the Jesel steel rocker versus a Jesel Sportsman rocker. There's not that much difference in weight, but the steel rocker is ultimately stronger and more compact. With a Jesel shaft, there's zero need for any sort of stud girdle (if you've ever used a stud girdle, you'll know what a pain in the ass it is). The Jesel shaft rocker is a great setup.  Heads are from Brodix. I've been a regular "user" of Brodix products for years and I'm a believer...L-O-L. Some of the nicest castings in the biz and flow numbers versus port volume are fabulous (they don't play games like some companies). I'm particularly fond of the BB-3Xtra lineup. The heads I'm using for Jane are 345-cc jobs. For more info, check out this video on my You Tube Channel: https://youtu.be/I7PclURsmO4 Here's one head:  Obviously, pushrods are needed. I wanted a double tapered setup because of the strength. The Jesel shaft setup doesn't need conventional rocker studs and it doesn't need pushrod guide plates. But to get there, I had to measure the pushrod length. I have a few different checking tools, but this one from Trick Flow is easy to use (you need two for a BBC because the pushrods are different lengths). I double check it with a dial caliper:  With the length determined, I could order pushrods. These came from Trend. They taper from 3/8-inch to 7/16-inch back to 3/8-inch. It took a long time to get them, but I think it was worth the wait. They're also awesome pieces....  Here's a look at the tip (FYI, I double checked the clearance in the head with these pushrods. Sometimes they mandate a bit of grinding in the head):  On the bottom end, I used a Melling billet pump with a bottom pickup. Years ago, I had a brazed pickup fall off a race engine. The braze job failed. It cost me an engine. That's why I really appreciate these Melling pieces. It's a standard volume example (but adjustable with a spring swap). By the way, that's a Melling pump drive.  Here's a look at the bottom pickup:  The oil pan is another work of art from Stef's. They make a special "Camaro Notch" pan, which obviously fits the Nova subframe. The way it's built, you gain max possible room under the crank at the stock engine cradle. Installed with the correct mix of mounts and frame stands, you can slide a piece of paper under the pan and the front crossmember...   The pan is incredibly well baffled too. Note the screen on the passenger side. That helps to strip oil off the crank and force it back into the sump. Joe and company know their way around oiling systems. I'm a huge fan of the company. It's just a stellar piece of fabrication...and it fits! In case you're wondering, Jane has wonderful, stable oil pressure!  Here are a couple of pix of the finished engine. I broke it in with Wix filters, but for regular use, I'm switching it to Baldwin filters (Moroso sells them). It's my understanding Baldwin made the original (way back when) AC PF35's. I might get some disagreement over this, but....If you cut a bunch of filters apart, you'll understand why.... . There are Huge differences in oil filters and the only way to see it is to slice and dice them.  Down the road, I'll show you the intake swap I did and I'll also show you the distributor I built to trigger the MSD 7. Stay tuned.... Last edited by Arrowsmith; 03-06-2023 at 09:58 PM. 
|
|
#43
03-06-2023, 11:06 PM
|
|||
|
|||
|
Quote:
There's a huge number of hidden "things" in this build that would otherwise go unnoticed. Happy I get to share some of it...
|
| The Following User Says Thank You to Arrowsmith For This Useful Post: | ||
Xplantdad (03-07-2023) | ||
|
#44
03-07-2023, 01:04 AM
|
|||
|
|||
|
Quote:
A long time ago, I would screen the lifter valley in engines I built, but I discovered (and Im certainly not the only one), they bring their own set of problems (oil drain back issues is just one example). Cheers!
|
|
#45
03-07-2023, 01:05 AM
|
|||
|
|||
|
Quote:
|
|
#46
03-07-2023, 11:59 AM
|
|||
|
|||
|
Quote:
|
|
#48
03-11-2023, 10:40 PM
|
|||
|
|||
|
Since we've segued to the topic of Baldwin filters, here's a Moroso #22460 race filter (Baldwin) cut apart. Draw your own conclusions, but this is my filter of choice:

|
| The Following 2 Users Say Thank You to Arrowsmith For This Useful Post: | ||
69M22Z (03-12-2023), olredalert (03-15-2023) | ||
|
#49
03-11-2023, 11:38 PM
|
|||
|
|||
|
Back to the build...
The ignition system I have is based upon an MSD 7AL buzz box and a simple matching MSD canister coil. But to trigger it, I did something different. The new kids who look after tech at MSD are aghast...(seriously)...like "that'll never work"...even though the instruction sheet for the 7AL2 clearly shows how to wire it for a point trigger distributor....L-O-L. I use a point trigger Delco to tell the MSD when to fire. There are reasons for this: The old Delco point distributors were (and are) extremely stable when properly setup. When properly setup, they're stable at 7,000 RPM. They are also very reliable. When used to trigger a buzz box, there is no need for a condenser. All the point set does (and you can only use a single point distributor) is to act as a switch. With this setup, points last almost forever. And the big deal is, I don't have to rely upon an often shaky electronic trigger mechanism (fact: way back when, when I owned a couple of speed shops, we actually warrantied more Mallory Unilite electronic distributors than we sold). Here's the overall setup out of the car:  The basic Delco I used was a super low mileage job from a 307 and as a result, the bushings were perfect. First things first, I set the end clearance. They're regularly way off GM spec and I have to shim them: 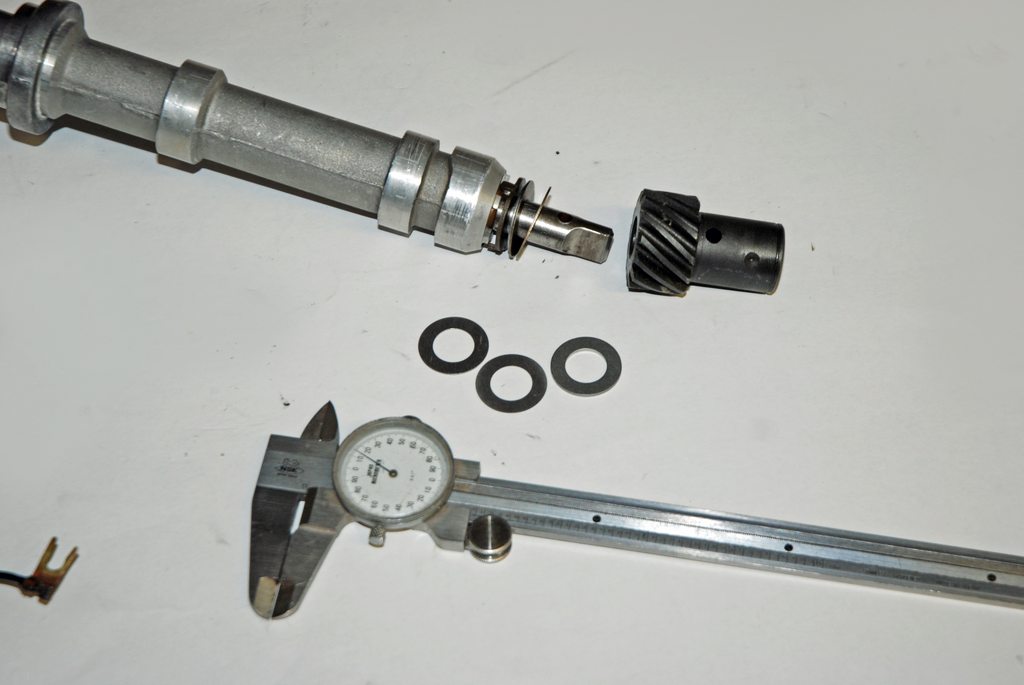 Upstairs, I limit the amount of mechanical advance:  I use one set of ACCEL performance (not race) points. Note no condenser: 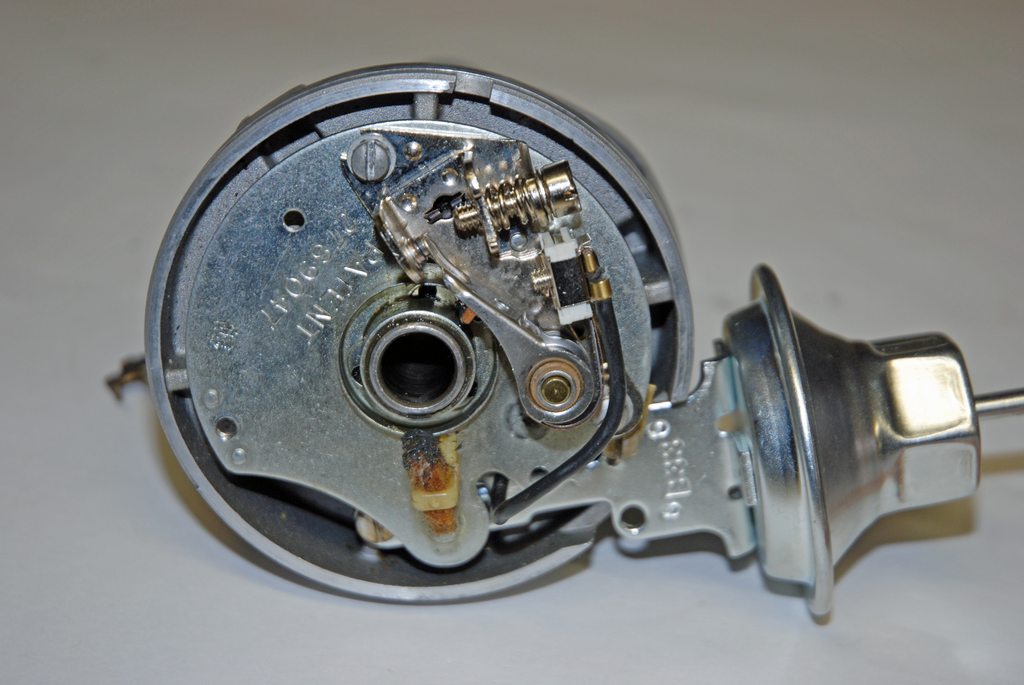 I usually use Moroso weights and springs. For this application (with an automatic) I want the curve to come in quickly, so I use the lightest springs: 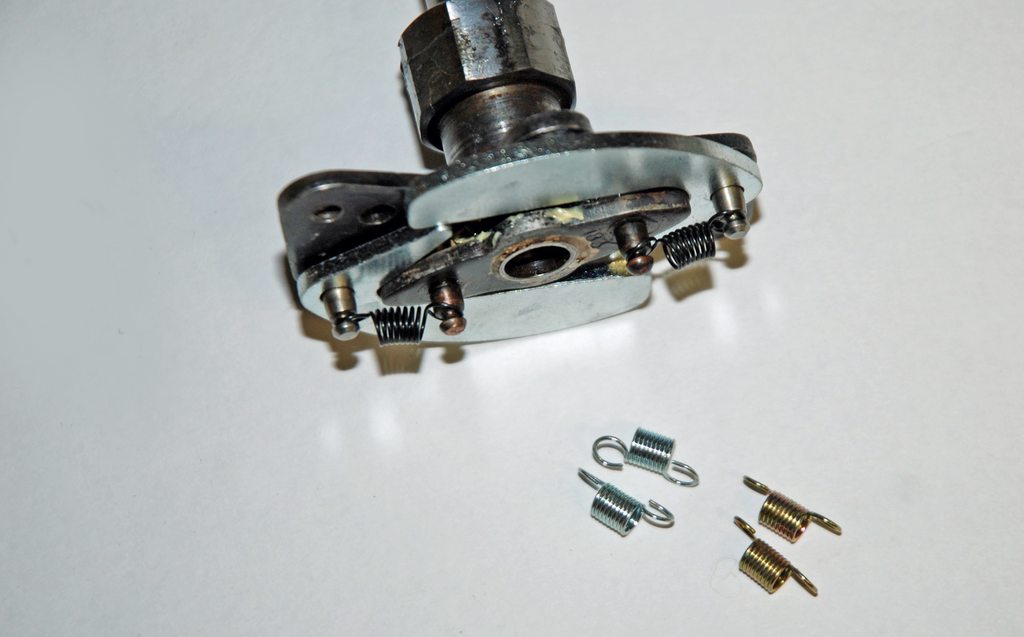 Some might scoff, but I still like to use a vacuum advance setup on a street car. It just makes sense, especially when cruising at a constant speed. This is an old Crane setup I used, and it's adjustable. I set it for the least amount of vacuum advance. 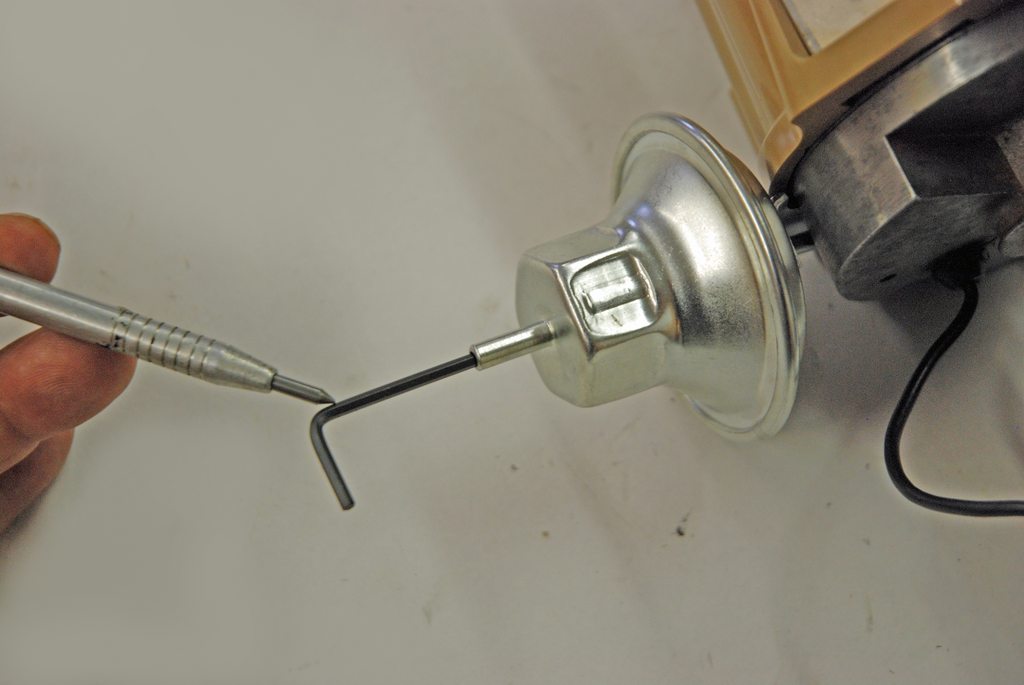 With a steel cam (roller) and a steel drive gear on the cam, you either need a bronze distributor gear or a melonized gear. I prefer the melonized gear. FYI, Chevy uses them on their roller cam crate engines: 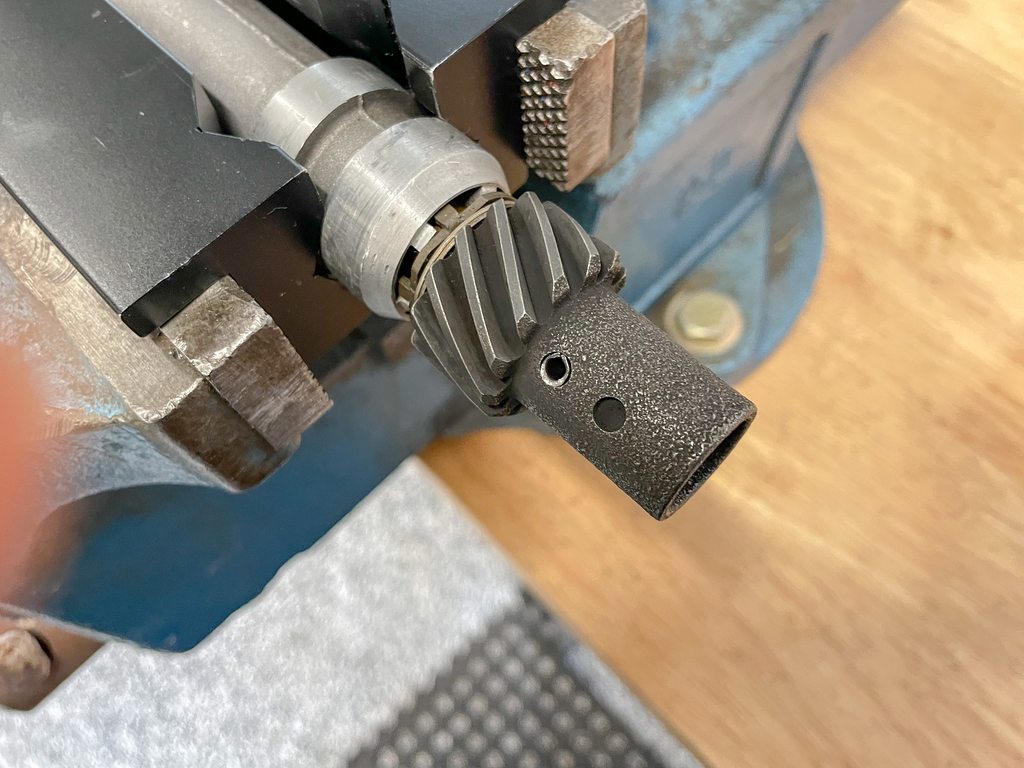 Upstairs, I prefer the old ACCEL caps and rotors. They're heavier and more robust than the new MSD pieces: 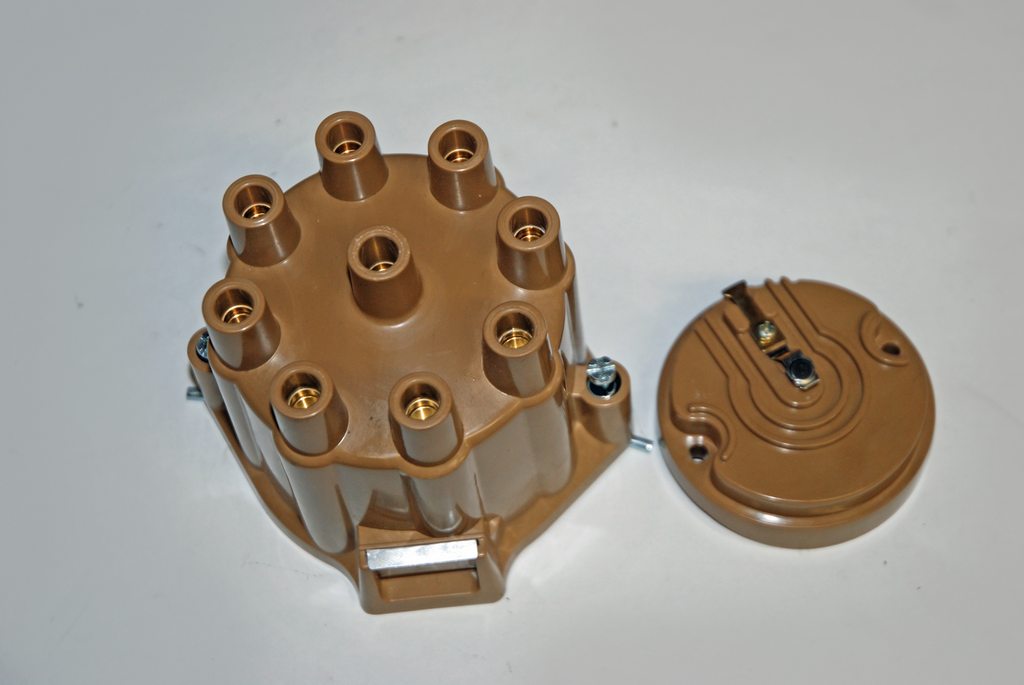 This is the finished distributor (less the melonized gear...which was installed later):  My intake manifold choice posed a real problem. The intent was to use a Weiand Strip Warrior single plane. But it clearly wouldn't allow the hood to close. I wasn't about to use any sort of hood scoop and I wasn't about to sacrifice filter area. Here's the Weiand in the car:  I needed something shorter, but there are some really issues: Stock big block Chevy intakes have a bolt hole over each siamese intake runner. Most aftermarket heads like the Brodix BB3's I use don't have the corresponding hole. Here's a look at an intake for a stock Chevy head layout:  If you place an intake gasket for a Brodix BB3 Xtra head over the manifold, this is the result...Incredible vacuum leak...L-O-L:  Because of all of this, the options aren't that great: Weld the offending bolt holes in an intake (that will fit) or find an intake that does work. In truth, there is only one out there, and it's about to be discontinued, simply because it costs lot of $$$. It's a Brodix dual plane intake. Here it is, side by side with the Weiand: 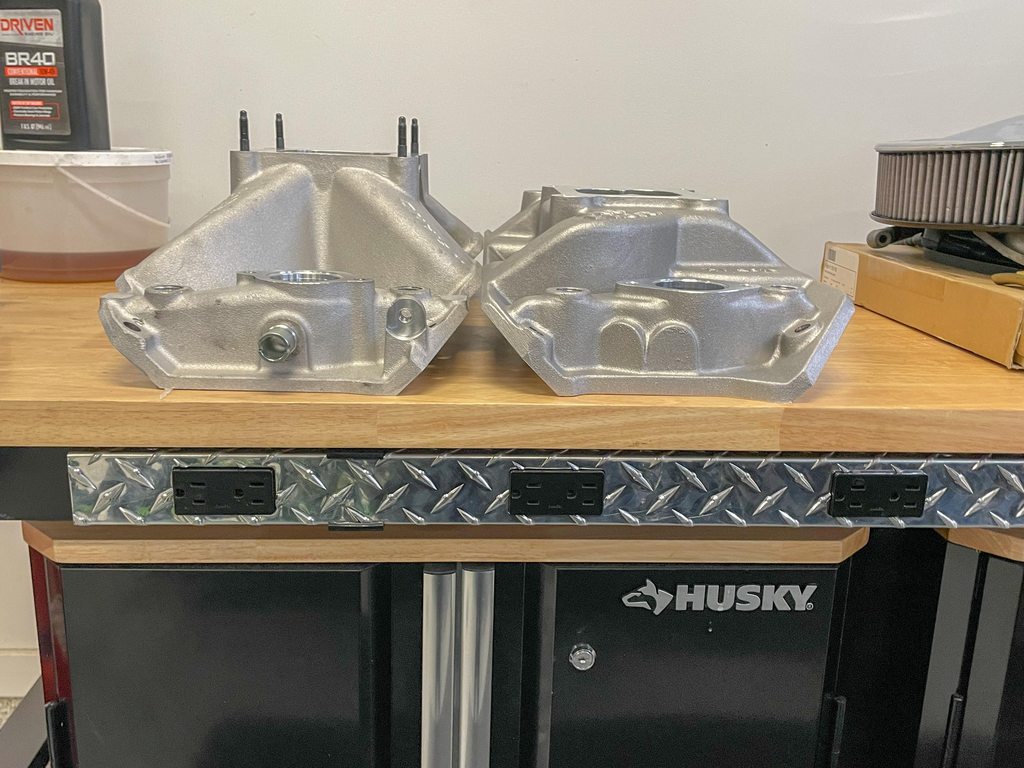 I suspect there's a pretty good power loss with the Brodix although Scott Shaffiroff's testing has proven it's not really that bad. On the car, it's easy to see it can clear the flat hood:  Here's the intake on the 565-cid big block. I sure can't complain about the throttle response...It's over the top. In fact, the big block rotates the tach like a hot small block. 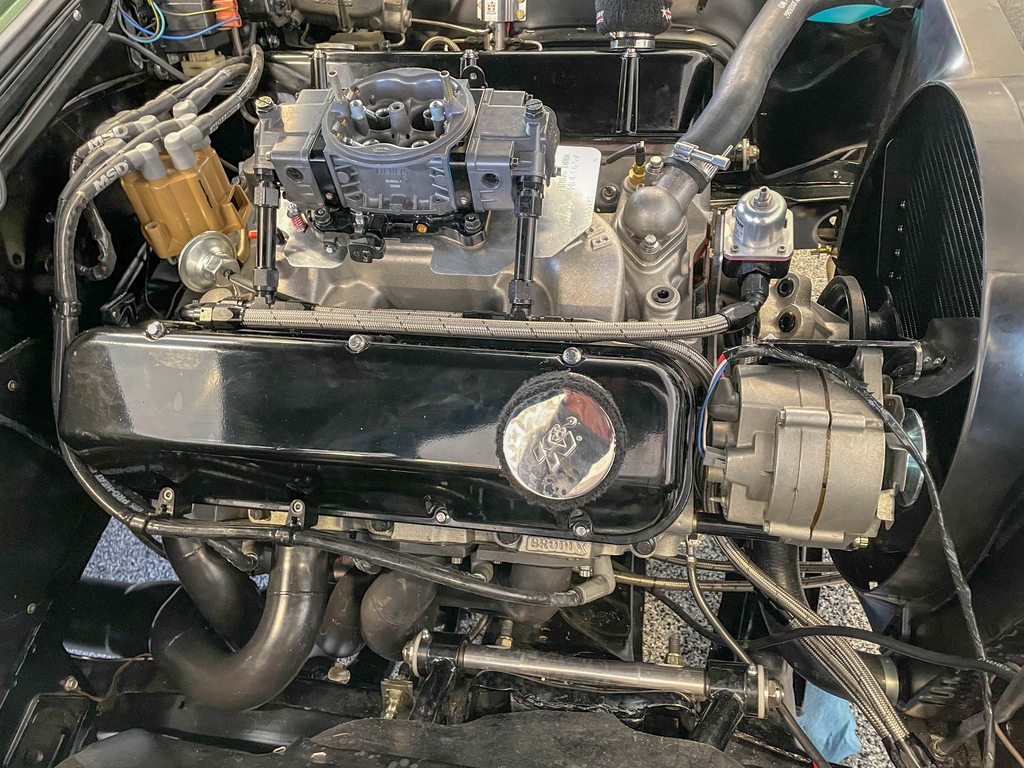 That's it for this episode...Stay tuned for more...
|
| The Following 10 Users Say Thank You to Arrowsmith For This Useful Post: | ||
69M22Z (03-12-2023), big gear head (03-13-2023), BJCHEV396 (03-12-2023), dykstra (03-12-2023), L78_Nova (03-13-2023), L_e_e (03-12-2023), markinnaples (03-13-2023), olredalert (03-12-2023), Tenney (03-13-2023), Xplantdad (03-12-2023) | ||
|
#50
03-15-2023, 10:09 PM
|
|||
|
|||
|
With the engine done, I was ready for the transmission and converter. Trouble was, those pieces were on a big wait list from ATI. They were roughly 100 custom transmissions behind. And since I'm a big fan of ATI, I bit the bullet, placed the order....and waited. In the meantime, it was an opportunity to mount an external trans cooler.
I had a really (Really!) nice Earl's stacked plate oil cooler on hand. It's big, but the reality is, there is no way possible to overcool an automatic transmission. Like some other parts, it has been recently discontinued by Earl's parent company, Holley. I suspect it was too expensive for them to produce and it's probably far cheaper to build something else (offshore?). Stacked plate coolers are really the best format. They're similar to old Corvette L88 rads. Here's the cooler:  These old coolers will accept almost any hose size, with o-ring fittings. They were originally designed so that they could be used as engine oil coolers. I'm using -6AN hose for the cooler lines. 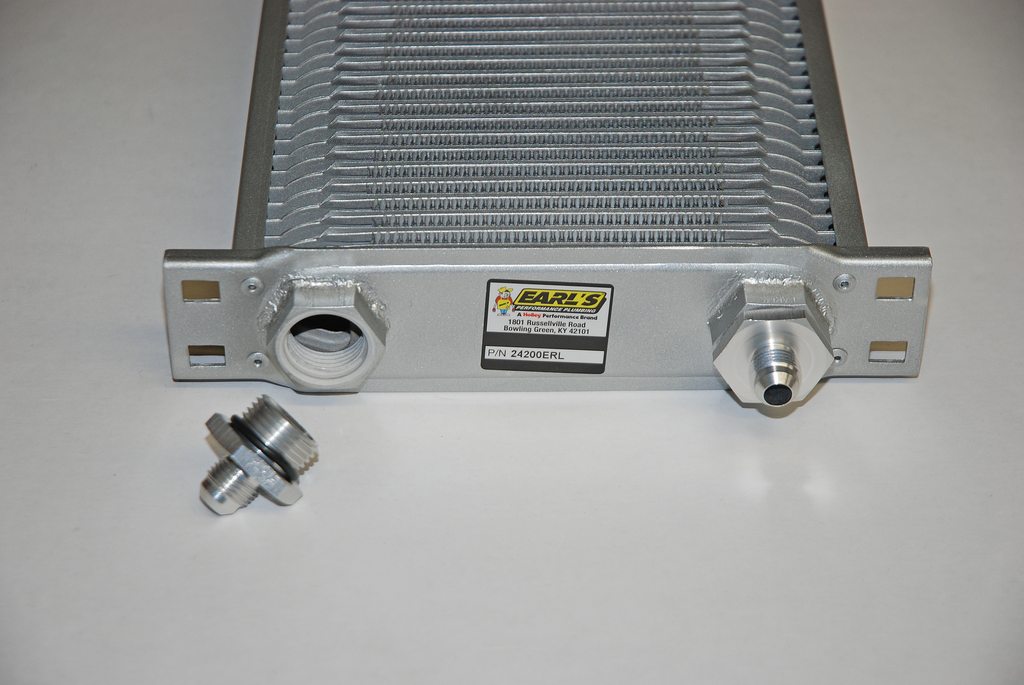 These are the optional mount brackets for the cooler. For my application, I used both, but had to fab up one more bracket.  I needed to build a bracket that would allow me to mount one end on the rad support and one end on the hood latch support (upright) at the nose of the car. So I dragged out this chunk of angle aluminum extrusion and the idea was to cut away anything that didn't look like a bracket (L-O-L):  I don't have a mill, so everything is done the old fashioned way...by hand! I used a saw, various files, a drill, a hole saw, and sanding blocks to fab parts. Here's the bracket roughed out. 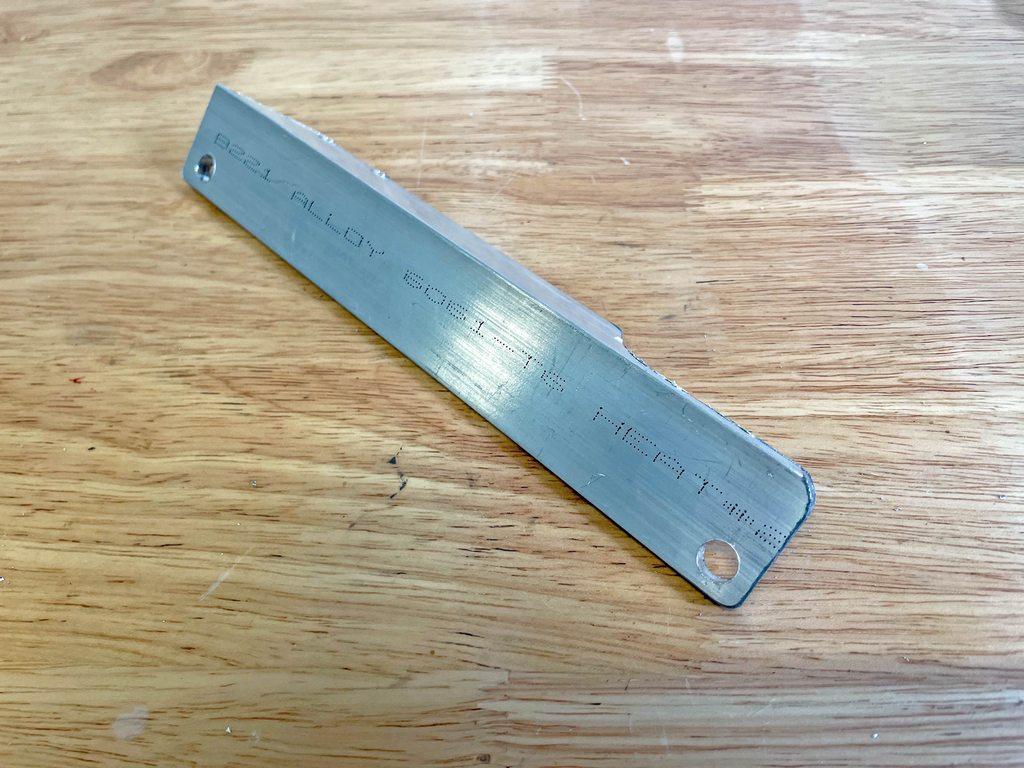 Because the bracket was hefty, I decided to remove some excess material. A decent hole saw and some Rapid Tap works wonders: 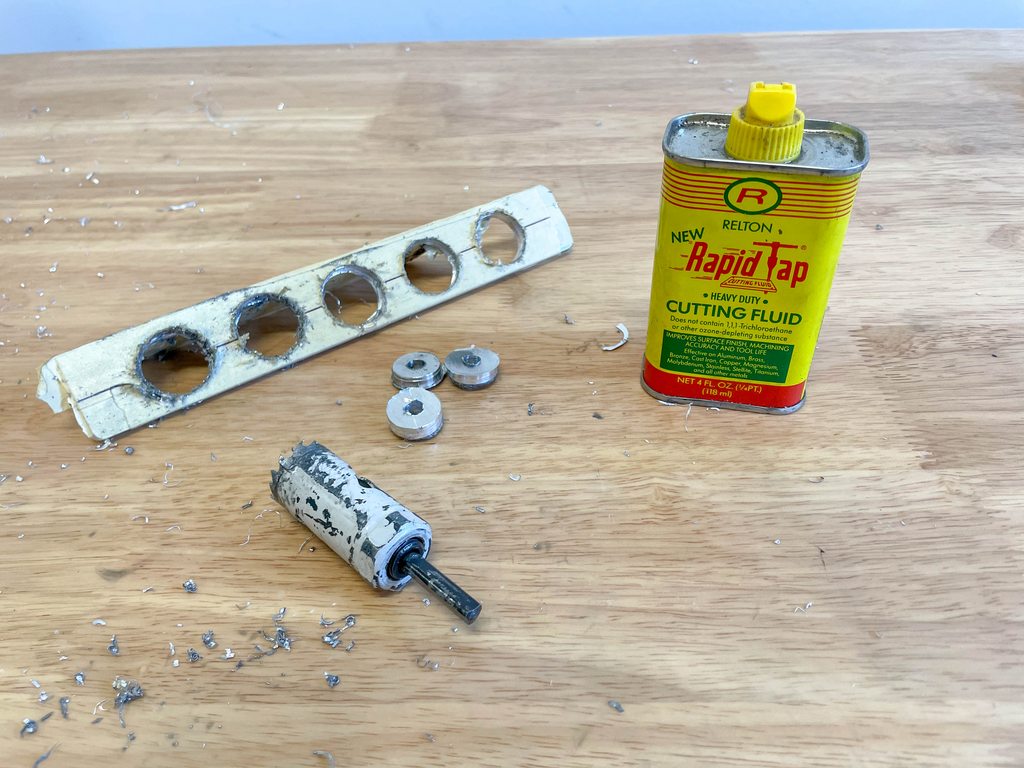 Here's the finished bracket after I cleaned it up and block sanded it: 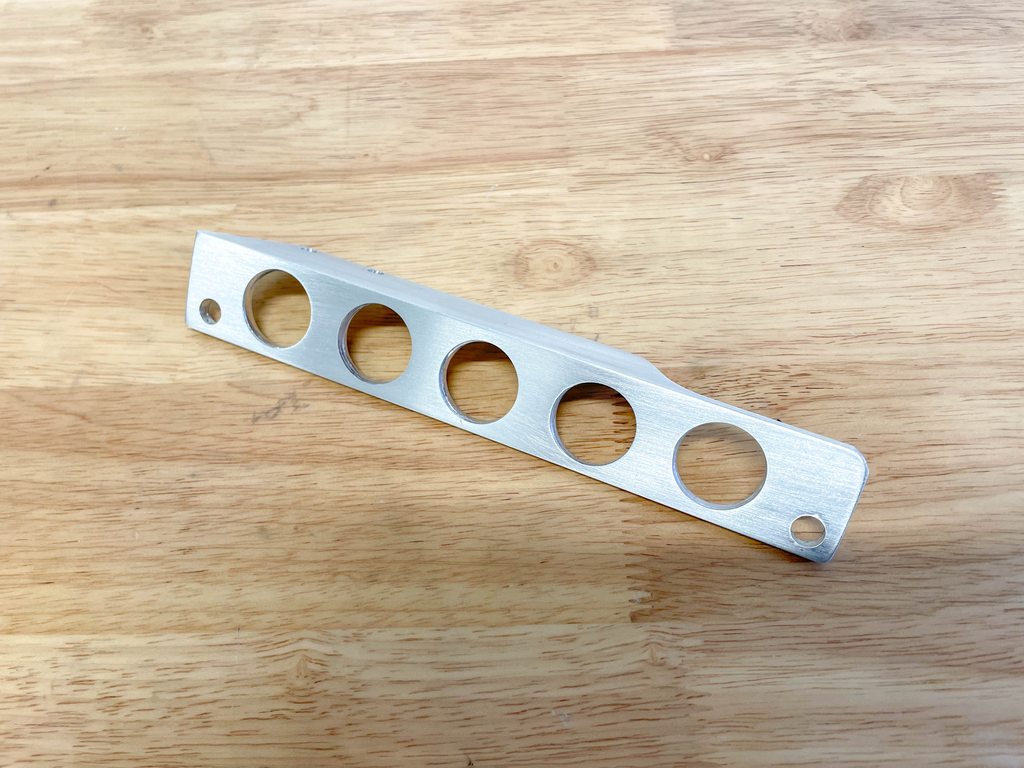 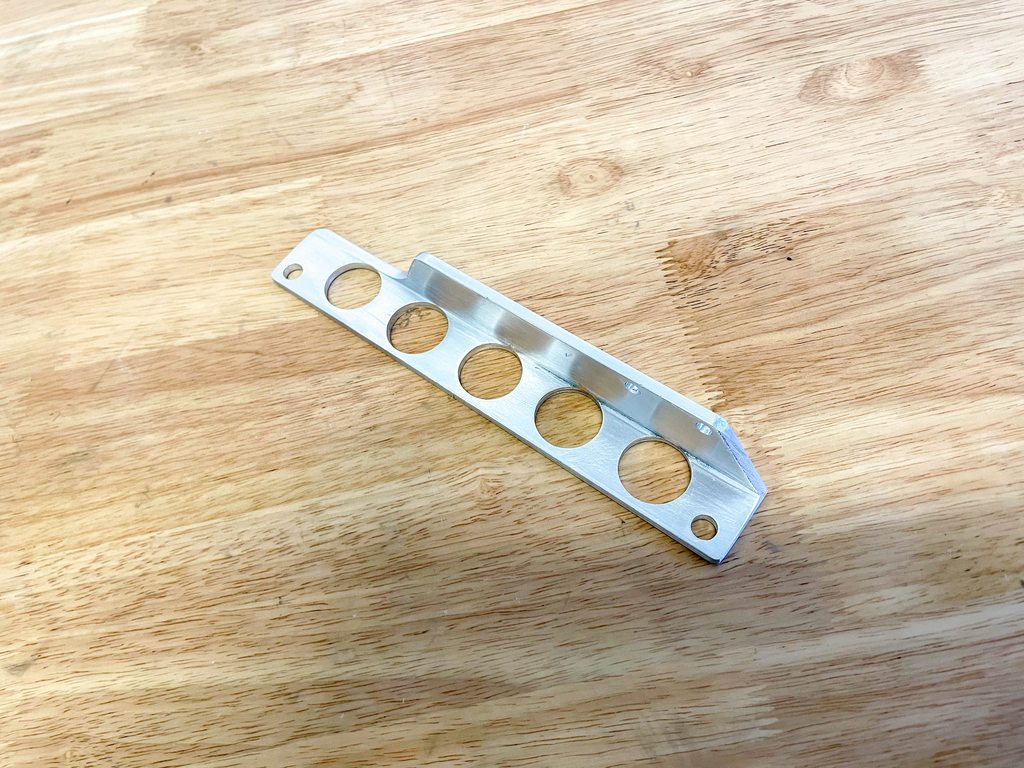 This is the cooler installed in the car. I use a mix of AN aircraft fasteners to bolt it to the car: 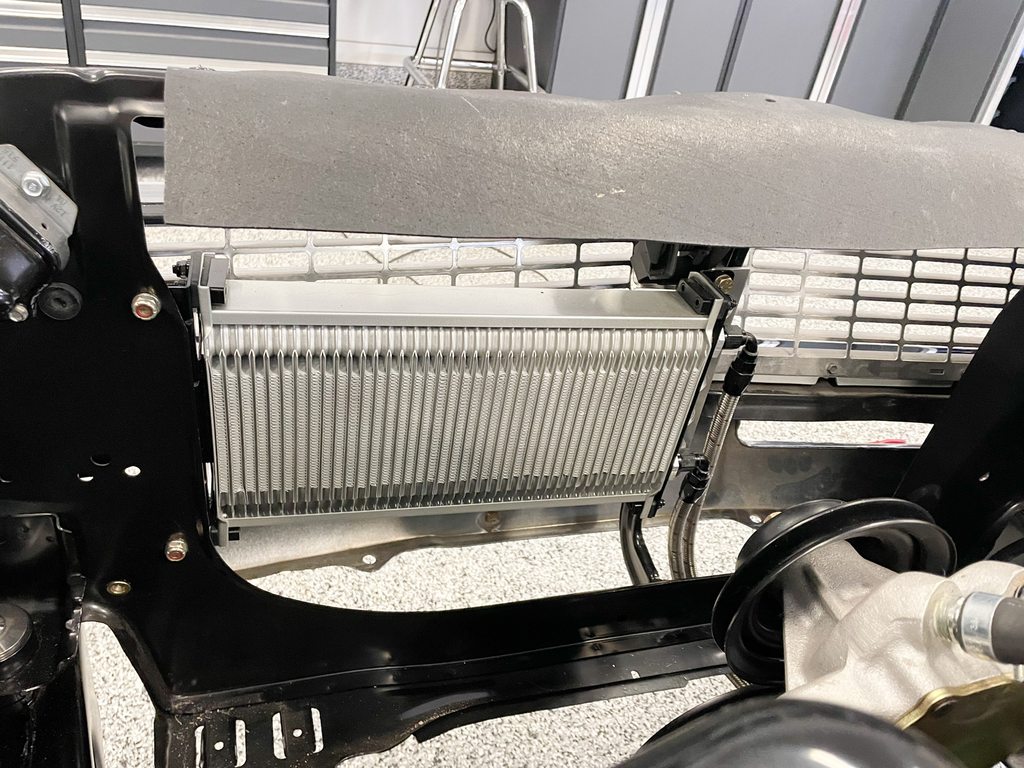 These are some later photos of the how the cooler lines are routed (transmission is in place here). I tried to keep close to the GM routing path, since it keeps the lines as far away from the headers possible. The first photo shows a pair of AN adapter fittings ATI builds:  The lines pass under the starter. I built a little bracket to affix the hose separator/clamp to an oil pan bolt. As you can see, I'm using a Tilton gear reduction starter. These are absolutely awesome. It doesn't drag with 14-degrees (or more sometimes) initial timing, turning the 565. By the way, there's a huge difference in these "mini-starters" from various companies. Tilton costs more, but it just flat works. 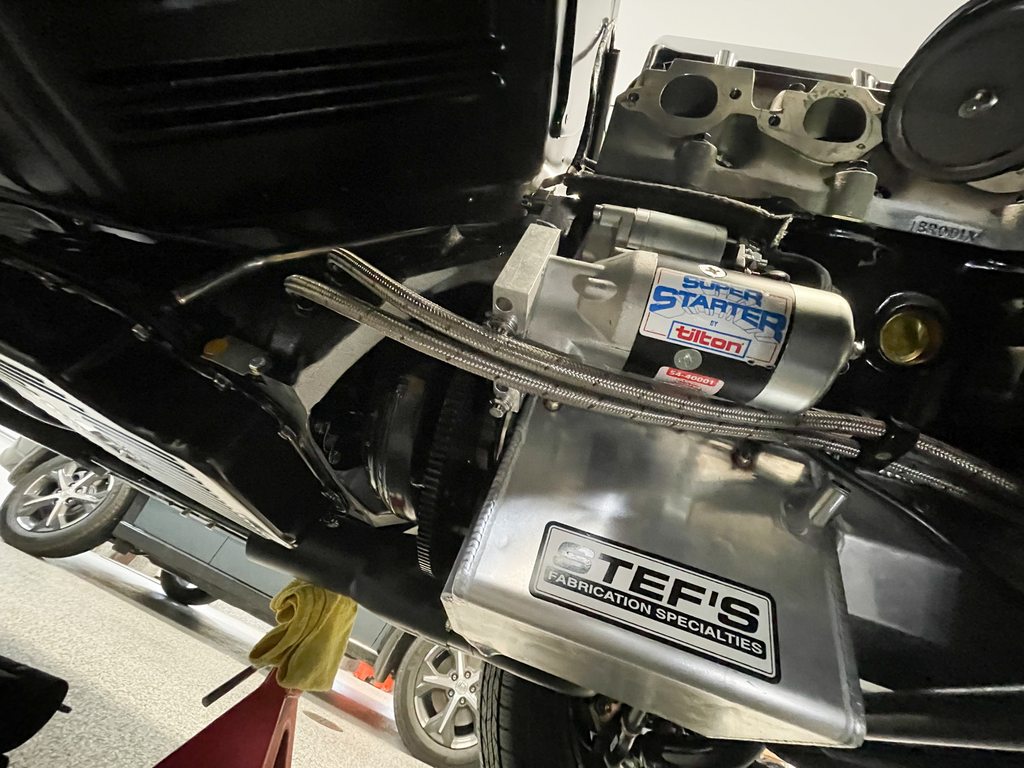 That's all I have for now. Next time, I'll show you some details on the shifter. I prefer getting it mounted prior to the transmission installation. Last edited by Arrowsmith; 03-16-2023 at 12:10 PM.
|
| The Following 8 Users Say Thank You to Arrowsmith For This Useful Post: | ||
big gear head (03-16-2023), dykstra (03-15-2023), L_e_e (03-16-2023), markinnaples (03-16-2023), olredalert (03-20-2023), scuncio (03-16-2023), Tenney (03-16-2023), Xplantdad (03-15-2023) | ||
|
| Thread Tools | |
| Display Modes | |
|
|


 Linear Mode

